Ladies around our way often make bags out of discarded coffee wrappers. Here’s a tutorial showing how to make the same sort of bag using plastic cat food pouches. Whilst it’s obviously best to avoid using things like this in the first place, this is a spectacular and really useful way to reuse something that would otherwise end up in landfill.
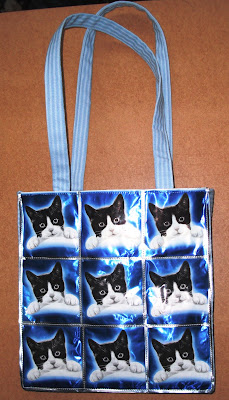
What do you think? Cool, isn’t it?
I’ve copied the tutorial directly from a superb blog called Life After Money by a lady called Ilona who I’m familiar with through Downsizer.net. Ilona is a bit of an expert on living life cheaply and uses up every scrap which comes her way. Some of her fabric bags are lovely. If you enjoy the tutorial, please take a look at the rest of her blog and drop her a line to say hello.
So, in Ilona’s own words and pictures, how to make your own.
How do you make a Cat Food Pouch Bag? from www.meanqueen-lifeaftermoney.blogspot.com/
Right, here we go with the next cat food pouch bag, I’ve made this a bit of a tutorial because two people have asked me how to do it. Maybe one or two more would like to have a go. I must warn you though that the smaller the bag, makes it more difficult, a bit fiddly and a struggle to get it under the foot of the sewing machine.
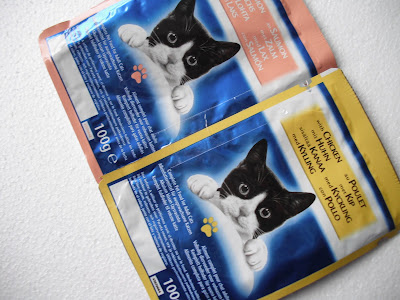
For this size you need 18 washed and clean pouches. To get the cat food out without damaging the pouch make a slit in the gusset along the bottom with a small knife or nail scissors.
The pouches have to be lined up square exactly with minimal overlapping, just enough to machine two together in a straight line without slipping off the edge. To keep them in place put a piece of sticky tape on the back. Here I am using ‘Felix As Good As it Looks’, the fronts are all the same. If you are using different colours lay them out first to the colour pattern you want.
Lay them side by side and stitch a neat straight line. I have used pale blue cotton to match the fabric I am using for the gusset, lining and handles.

Tie each end off neatly. Don’t forget you will not be able to do any additional stitching through the pouches because once you have punched a hole through, it will not go away and will spoil the finish.

The same again now you have three in a row.
Make three rows of three.
Then you join two rows in the same way, sellotape underneath it will help to keep it in place while you sew. I have overlapped the writing on the pouch because I don’t want it to show on the finished article. I haven’t cut off the excess. You can expose the whole pouch if you want to, overlapping just a fraction.
The same again making a sheet of nine pouches.
Make another sheet in the same way, which gives you the front and back of the bag. The writing at the top will be folded inside the bag.
Next you need to make a gusset. You can’t sew the front and back together because the pouches are stiff and you wouldn’t be able to get much in the bag. I have chosen pale blue fabric from a set of curtains I got from a charity shop. Measure the distance around three sides of the bag, this one is 36 inches, and cut a piece which is about 8 or 10 inches wide, it depends how wide you want the gusset. I have cut the hem off the curtain, plus another six inches.
Turn the raw edge under and pin it, then hand sew this with a hem stitch, you don’t want it to show from the other side. My gusset is two inches wide and four layers thick.
Now comes the akward part, sewing it to the pouches. Don’t pin it because you don’t want extra pin holes, but start at one end, lining up the two pieces exactly. Feed it gently through the machine, don’t rush. Going round the corners is very difficult if your fabric is thick, which mine is. So I stopped half an inch from the corner, remove from the machine leaving enough cotton to finish the corners by hand. Then start again on the next straight piece. If your fabric is not so thick you might be able to whiz round the whole side with the machine.
Do the same again attaching the other side. The seams have to be on the outside because you would not be able to turn it inside out due to the stiffness of the pouches. The underside of the bag.
If you have to finish off the corners by hand as I have, you need to make small stitches identical to the machine so you can’t see the difference.
That’s the bag part done, now you need a lining. I have used the same fabric, although it is a little too thick. I don’t have a lightweight alternative in the same colour, so this will have to do.
With the right side inside. It must be an exact fit, as the two top edges have to be sewn together.
Don’t forget you can’t pin, I used pegs to check the fit and to keep it in place. Mine was slightly too big so I had to re do the seams taking them in a bit. If you make it too small you can’t adjust it and will have to make another. It has to fit snugly inside.
Next are the handles. I have cut mine from the edge of the curtain to utilise the already sewn hem. They need to be quite thick but able to go through the machine, bearing in mind that you have the thickness of the bag as well.
I stitched just the one side on the machine. They are two feet long because the trend seems to be over one shoulder, but you can make them any length you like.
Place them between the two layers, measuring the distance from the outer edge, making sure both handles are the same length, not twisted and the seams are facing the same way.
Pin them to the lining only.
Almost there, now comes the difficult bit. I swapped the pegs for large paper clips, because they get in the way when you are machining. I can remove a piece of the plastic base from my machine, making it a bit easier to sew akward shapes. If you can’t do that I suggest you sew with the pouch side down, and the lining on top. You have to manipulate the handles when they get in the way, sew very slowly making sure the top of the lining and pouch are perfectly in line. Inch by inch, removing the paper clips as you go. Even though the corners were very thick, I managed to get the needle through, sometimes gently easing it by hand.


Leave a Reply